Door Removal, Panel Removal, Panel Installation, & Roof Vent Removal - Part 3

As we mentioned in part 1, we had a lot of working going on the last couple days! Here’s what was on the docket:

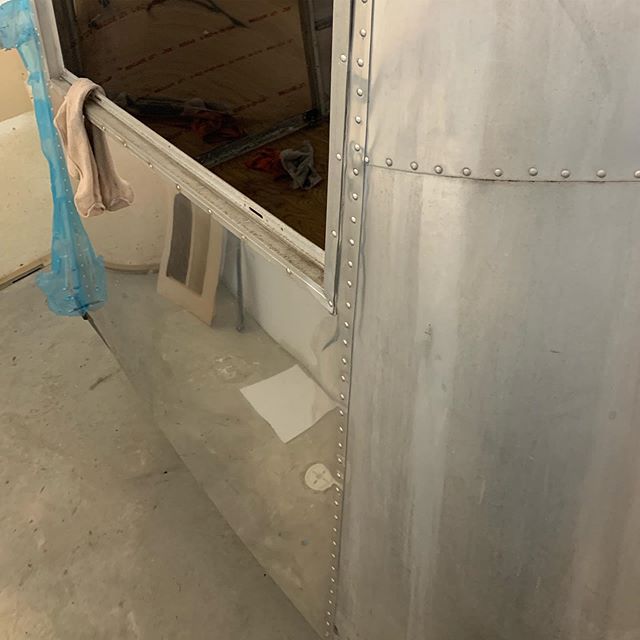
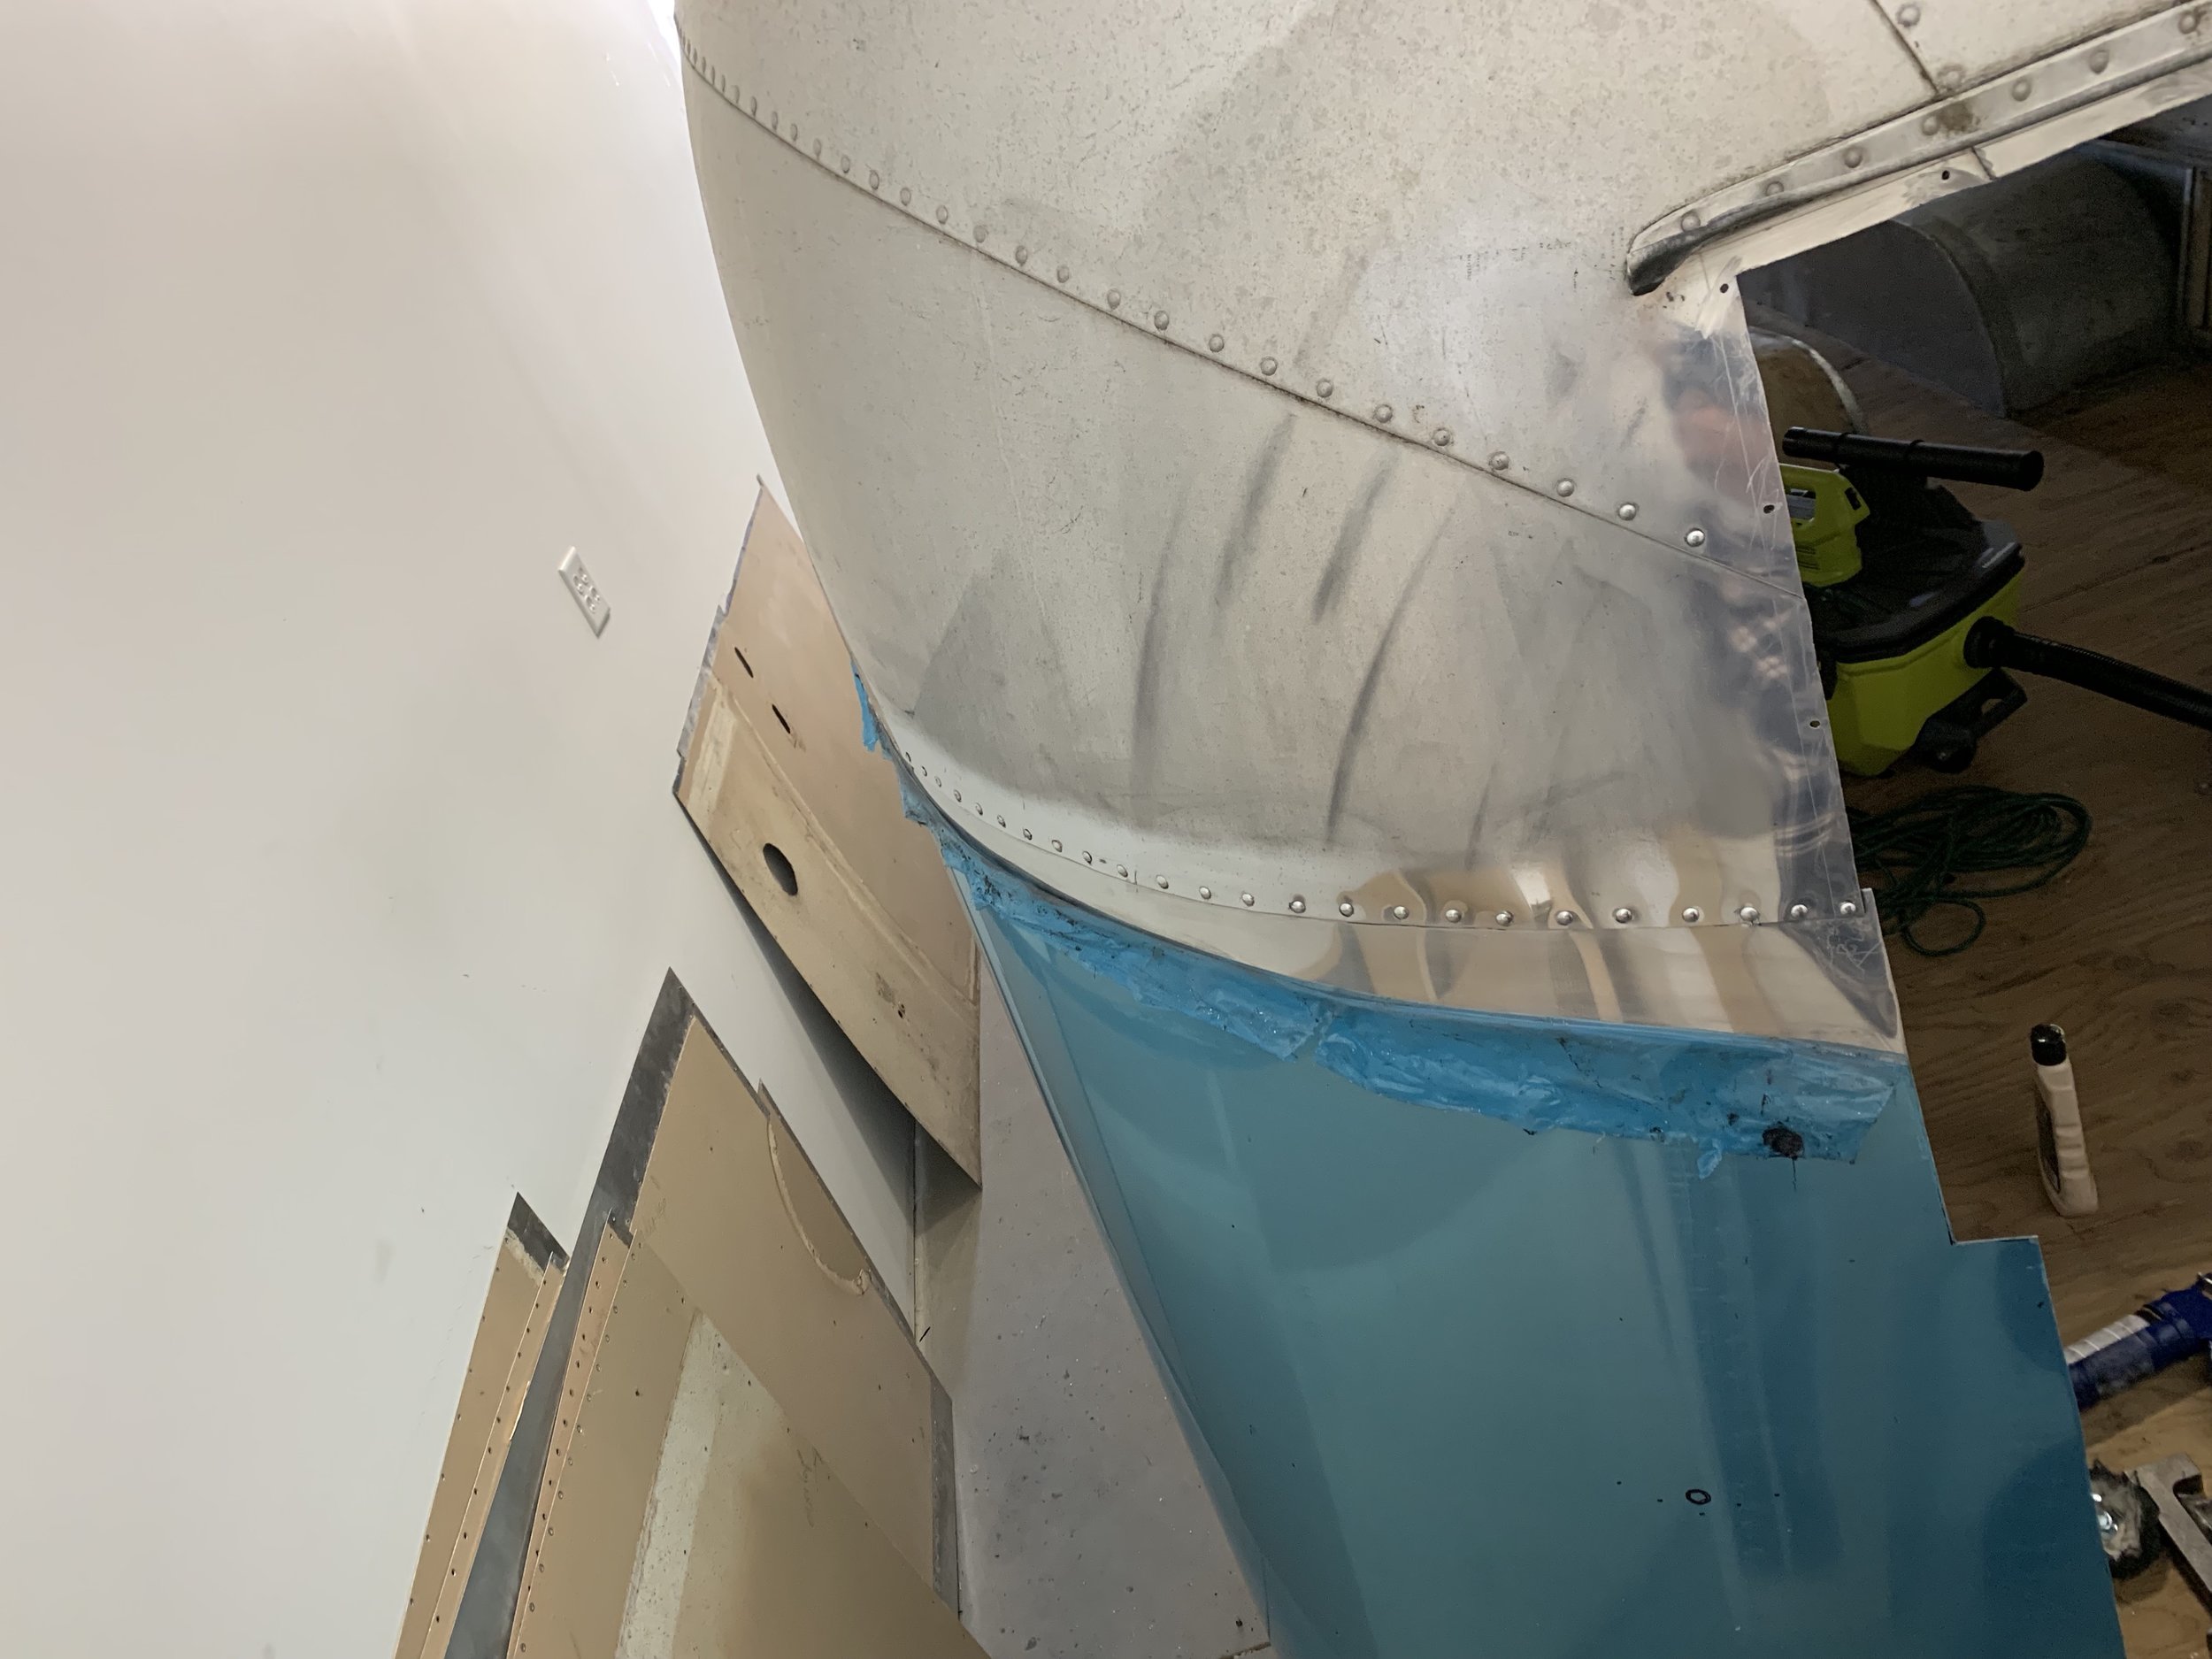
Today we’ll talk about the new panel installation! We wrapped up our rear lower street-side panel installation finally! We had it tacked in for a long time but hadn’t finished the buck riveting and getting everything aligned. Well we finally did it. I don’t know what the problem is with some of these things. I hope someone that’s reading this can sympathize. When I work through something in my head and I can’t quite feel comfortable with the process, I have a hard time finishing something up until I can get my mind completely wrapped around it. This time it was with this panel.

We got all the buck rivets and the sealant/adhesive on the top all into place and set and I couldn’t wrap my head around getting the bottom all straight while keeping the panel from bucking while also following the contour of the rear corner. Well, it all worked out just fine. We tacked in the bottom of the panel in the gap where the rear panel will go eventually, and tightened up the bottom as tight as we could go. Then we made sure that the top of the panel was straight and aligned. Drill a couple holes, plug in some clecos and voila! we’ve got a panel aligned. The last stage was to get the buck rivets in at the top and cleco in the bottom to the bottom C-channel.

All in all it turned out perfectly. I’m super happy that the dents and crumples are gone and we have a new shiny panel all in place. I should probably not stress out so much about it being perfect.

More tomorrow about the roof vent replacements. More to come on the rear panel in place as well!

Door Removal, Panel Removal, Panel Installation, & Roof Vent Removal - Part 2

As we mentioned in part 1, we had a lot of working going on the last couple days! Here’s what was on the docket:

  • Remove and strip down the door-in-door door (Part 1)

  • Panel Removal (Part 2)

  • New Panel Installation (finally finishing it) (Part 3)

  • Beginning Roof Vent Removal (Part 4)

While we were taking the door off, we realized that the panel behind the door had some dings in it that would never look right after polishing. This was likely from years of abuse. There’s one piece of engineering that I’ve never been able to understand when it comes to Wally the Airstream. 99% of the things that they did in 1959 on these things, I agree with. Here’s one I don’t. The door has a suicide opening. Meaning, if you’re looking at the door, the hinges are on the left side. Now there’s a really good reason for this, the door opens from right to left and thus, the hinges don’t have to go where the 2 Hehr Clearview windows are stacked to the right of the door. It also means that when the door is open, it opens to the side where the old furnace and refrigerator stood and doesn’t block the windows. Ok, fine makes sense… But what doesn’t make sense at all is that if you accidentally don’t latch the door well enough, keep in mind Airstreams have a tendency to flex and change over time, when you’re cruising down the road at 65mph, if the wind catches the door and flings it open, you’ve created a hinged missile with a path of destruction for both the door handle and the panel to the left of the door.

This especially a problem when that Bargman 77 vertical lock that’s on the outside of the door is impossible to find replacements if it slams into the skin. Even better, it’s made of poured metal and a little brittle 60 years later. More than that, when one does show up on the market, they’re about $1400 for the set. So, yea. Let’s hope that doesn’t happen.

So, back to the original story, our hinged missile clearly made its way into the wall a few times as there were quite a few dents and as the aluminum is 60 years old, we decided, since we’re now Airstream panel fabrication specialists, to replace it with new.

First step, decide where to run the new panel. This is the bottom curb-side panel that stretches from the door frame back to the rear lower cap on the exterior. As I didn’t need to replace the whole stretch and I didn’t want to have to un-rivet and re-rivet all of the bottoms of the windows, I elected to go to the stud that is just to the right (aft) of the windows in mid-cabin.

Second step, drill out all of the rivets.

Third step, Cut the panel with our electric shears and pull it down.

Here’s a video of the process:

Time to order some aluminum from Airparts! I’ll be back with Part 3 tomorrow!

Door Removal, Panel Removal, Panel Installation, & Roof Vent Removal - Part 1

Today was a busy day. Kyle had Jackie’s dad Don along to help today. We got a lot done today. Here’s what’s on the docket:

  • Remove and strip down the door-in-door door

  • Panel Removal

  • New Panel Installation (finally finishing it)

  • Beginning Roof Vent Removal

We started off by getting the door off the side of the Airstream and getting it laid down on a work surface. It looked like the door had been reattached at some point as evidenced by the use of low-quality steel pop rivets. This doesn’t work on a lot of levels. First, steel rusts. They had already begun to rust. Second, Pop rivets look terrible compared to buck or Olympic rivets. Third, they look awful. Fourth, they look awful. So, we drilled out the pop rivets and got the door laid out. In the process of looking more closely at the door, it was decided that both the interior and exterior skins of the door would look a lot better if they were new aluminum. So, here I am (Kyle) putting a large order into Airparts for some 2024-T3 AlClad .032 Aluminum. I’m getting pretty decent at this. Truth be told, I need a bunch of stuff from Airparts as you’ll see in the next couple couple paragraphs. Here’s a video of stripping down the interior panels from the door-in-door model.

Part 2 to come tomorrow will be about the surprise panel removal we made today! Stay tuned for more!

Building the Scaffolding for Roof Work

Without the interior skins attached to the studs inside, the exterior aluminum isn’t strong enough to hold weight on the roof. So, to be able to polish the roof and replace the vents and add an air conditioner, we needed a place to work from. Enter scaffolding. We looked into buying metal scaffold but it’s too wide and too expensive. So we made our own.

Here’s the video of the build process at 30x speed.

The Aluminum Sourcing Saga

The Aluminum Sourcing Saga

Hey all! Sorry we’ve been so slow on the updates lately! There’s been a lot going on both good and bad! Kyle has been traveling a ton for his job the last few weeks so progress has slowed a bit. But, we’ve also had a couple of other small issues.

First, the sheet of aluminum that we ordered from Discount Steel for the street-side lower rear panel looked funny when it arrived. It’s the piece that we shared the video of Kyle cutting a couple weeks ago. It was dull, wouldn’t shine, and it seemed to look the same on both sides. It also didn’t match the piece that we had laser cut for the rear.

Read More

Cutting out the New Rear Street-side Panel

Cutting out the New Rear Street-side Panel

Here we're cutting the 0.040" 2024 T3 AlClad aluminum for the rear street-side lower panel replacement. Our previous panel was really beat up and rather than putting all the time on an English wheel to straighten it out, we elected to just replace the panel. This one is a little thicker compared to the original panel that was 0.032" thickness. After making a template from the old panel with cardboard, we marked up our panel and got to work! Here I'm using the Harbor Freight 18 gauge, 3.5 amp heavy duty metal shears. They cut through the aluminum like butter.

Read More

Rear Laser Cut Aluminum Sheet Arrived

Rear Laser Cut Aluminum Sheet Arrived

As we had previously posted, we had a new piece of a aluminum cut at Discount Steel and we received delivery today. Those with a discerning eye will identify that the piece is like a U-shape that encompasses the rear window.  This isn't exactly like the original.  When Jim did the shell-off restoration of the frame and the flooring, the new flooring ended up being a tad bit wider than the original.  Because of that, the rear of the shell didn't fit exactly back together where it was originally riveted.  Now, most would say, "Hey, that's not good", well, in this case it's actually okay with me.  I like the idea of this new aluminum, which I purchased at a slightly thicker grade than original (.040 vs. .032) will support the window better.  Also, the rivet holes that were drilled in the rear are a little too big for my comfort in the original pieces so this new piece will cover them over.  All in a good day's work!

Read More

Doing some exterior body work

 Doing some exterior body work

Wally had some dents and dings in his previous life! A few of them, we just weren't okay with leaving them where they were at.  One of the challenges of working with a 59 year old Airstream is the 59 year old aluminum skin.  While we have some AWESOME friends that have some amazing metal working skills (Rob is a master fabricator at Donnie Smith's in Blaine, MN), the metal is so old and oxidized that it has become brittle and a little more difficult than new to work with.  So, we're moving forward with removing the two rear panels that were the worst offenders and replacing them.  Drilling out rivets is fun! /sarcasm. 

Read More